How to propagate Monstera is simple when you start with a healthy cutting that includes a node. Most growers root cuttings in water or soil, with visible growth in 3–4 weeks. According to the University of Florida Extension, nodes are crucial for the formation of new roots. With the right steps, you’ll avoid common mistakes and grow thriving plants.
This topic is now fully covered in our complete guide here: Monstera Plant Care: Secrets to Vibrant Green and Variegated Leaves
Table of Contents
In This Article
Why Propagating Monstera Is Worth It
Benefits of Propagation (Save Money, Multiply Plants, Share with Friends)
Learning how to propagate Monstera is one of the most rewarding skills for plant enthusiasts. Not only does it help you grow more plants without spending extra money, but it also ensures you get healthy, strong cuttings directly from your own collection. Instead of purchasing a new Monstera, propagation lets you create thriving plants from just one parent specimen.
There are several benefits to knowing how to propagate Monstera successfully:
- Save money: A single plant can be multiplied into many, cutting down on future purchases.
- Multiply your collection: Whether you prefer water, soil, or air layering, propagation methods give you flexibility.
- Share with friends: Passing along a rooted cutting makes a thoughtful, sustainable gift.
- Promote sustainability: Reducing demand for commercially grown plants helps minimize environmental impact.
In fact, a 2022 National Gardening Association survey found that over 30% of houseplant owners propagate and exchange cuttings, making it one of the most popular ways to expand collections. Experts at the University of Minnesota Extension also highlight propagation as a smart, sustainable practice that strengthens plant care knowledge.
When you understand how to propagate Monstera the right way, you’re not only saving money but also creating opportunities to connect with other plant lovers while reducing waste.
When Is the Best Time of Year to Propagate Monstera? (Spring/Summer)
Another essential factor in learning how to propagate Monstera is choosing the right season. The best time is during the active growing months of spring and early summer. This is when the plant naturally produces new growth, allowing cuttings to root more quickly and successfully.
During colder months, Monstera slows its growth, and propagation attempts often lead to stalled or rotting cuttings. That’s why experts recommend taking cuttings when:
- Temperatures stay above 65°F (18°C).
- The plant is producing new leaves and nodes.
- Light levels are bright but indirect, fueling root development.
The Royal Horticultural Society notes that tropical plants like Monstera thrive best when propagation aligns with their growth cycles. By focusing on spring and summer, you give your cutting the highest chance of developing strong roots and thriving as a new plant.
When planning how to propagate Monstera, always watch your plant for signs of fresh growth—it’s nature’s signal that the timing is right.
Tools and Materials You’ll Need
Before learning how to propagate Monstera, it’s important to gather the right tools and materials. Using clean, high-quality supplies not only increases your success rate but also prevents common issues such as rot or infection. According to the Royal Horticultural Society (RHS), plant cuttings taken with sterilized tools have a significantly higher chance of rooting successfully. Below are the essentials every plant enthusiast should have ready.
Choosing Sharp, Sterilized Scissors or Pruning Shears
One of the most critical tools for propagation is a pair of sharp, sterilized scissors or pruning shears. A clean cut helps the Monstera cutting heal quickly and root faster, while dull blades can crush stems and slow growth.
- Why sterilization matters: Dirty tools can spread bacteria and fungal infections. According to the University of Florida Extension, sterilizing tools with rubbing alcohol or a 10% bleach solution reduces the risk of disease transmission between plants.
- Best practice: Always wipe your blades before and after each cut. If you’re taking multiple cuttings, disinfect between cuttings to avoid cross-contamination.
Think of sterilization as an investment in your plant’s long-term health. Skipping this step is one of the most common mistakes beginners make when exploring how to propagate Monstera.
Best Containers for Water Propagation
Many plant lovers prefer starting their Monstera cuttings in water because it’s simple and allows you to watch the roots grow. However, the type of container you choose makes a big difference.
- Glass jars or vases: Transparent containers let you easily monitor root development and water clarity. Choose a jar with a narrow neck to help support the cutting.
- Size matters: Ensure the container is tall enough to submerge the node but not so deep that the leaves sit in water, which can cause rot.
- Water quality: Use filtered or dechlorinated water if possible. Tap water high in chlorine may delay root growth, as suggested by houseplant experts at The Spruce.
For best results, change the water every 5–7 days. This prevents bacteria buildup and keeps oxygen levels high—two factors that are essential for strong root development.
Recommended Soil Mix and Rooting Hormone
If you prefer propagating directly into soil, the right potting mix and optional rooting hormone will set your cutting up for success.
- Soil mix: A well-draining mix is key. Many experts recommend a blend of:
- 1 part peat moss or coco coir (for moisture retention)
- 1 part perlite (for aeration)
- 1 part orchid bark (to mimic natural conditions)
- Rooting hormone: While not required, rooting powder or gel can speed up the process and reduce the risk of failure. According to a study published in HortScience, cuttings treated with rooting hormone showed up to 20–30% faster root development compared to untreated ones.
When using soil, ensure the container has drainage holes. Overly wet soil is one of the biggest causes of root rot, which is why many growers like to start in water before transferring to soil.
Key Takeaway
Having the right tools and materials isn’t just about convenience—it’s about setting your Monstera cutting up for long-term success. Sharp, sterilized shears prevent infections, glass jars support water propagation, and a well-balanced soil mix gives roots the air and nutrients they need. By preparing these essentials before you begin, you’ll avoid common mistakes and increase your chances of propagating a thriving new plant.
Step-by-Step Guide on How to Propagate Monstera
Learning how to propagate Monstera can feel intimidating at first, but breaking the process into clear steps makes it simple and rewarding. By choosing the right stem, making a precise cut, and providing ideal rooting conditions, you can create strong, healthy plants that thrive for years. According to the Royal Horticultural Society (RHS), propagation success improves significantly when cuttings are taken from vigorous stems during the growing season.
Step 1 – Identify a Healthy Stem with a Node and an Aerial Root
The first step in learning how to propagate Monstera successfully is selecting a cutting with a node—the small bump along the stem where roots and leaves grow. Without a node, rooting won’t occur.
- Look for aerial roots: These brown or green root-like structures signal that the plant is already trying to grow new roots.
- Choose healthy growth: Stems should be firm, green, and free from pests or yellowing leaves.
📌 Expert Tip: The University of Florida Extension emphasizes that cuttings from strong, pest-free plants have the highest success rate in propagation.
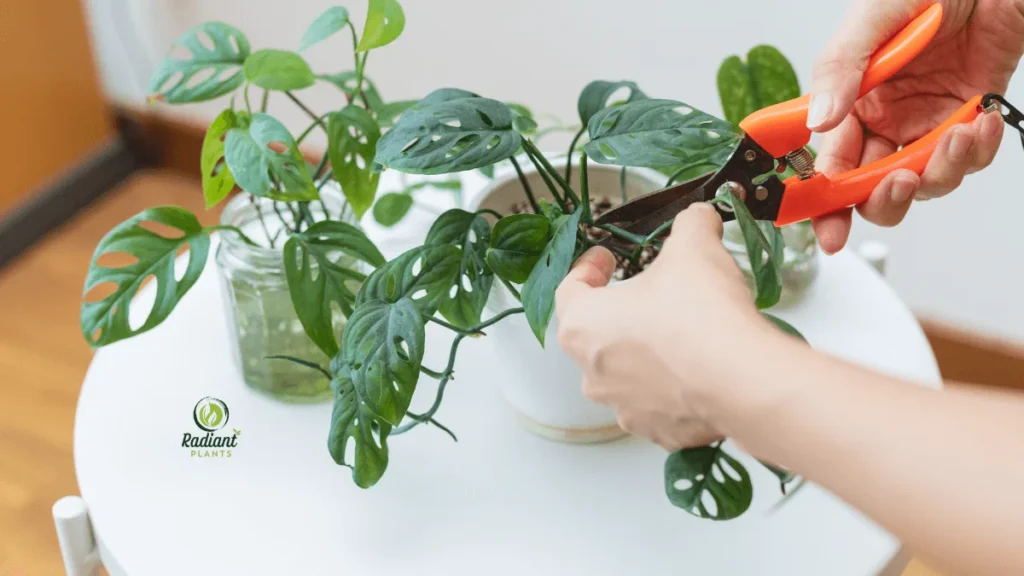
Step 2 – Cut Just Below the Node for Best Results
Using sterilized scissors or pruning shears, make a clean cut just below the node. This ensures the node remains intact and ready to develop roots.
- Why it matters: A clean, angled cut prevents stem damage and reduces the risk of infection.
- Sterilization tip: Wipe blades with rubbing alcohol before cutting to prevent bacterial transfer.
Cuttings 4–6 inches long with at least one node and one leaf generally root the fastest.
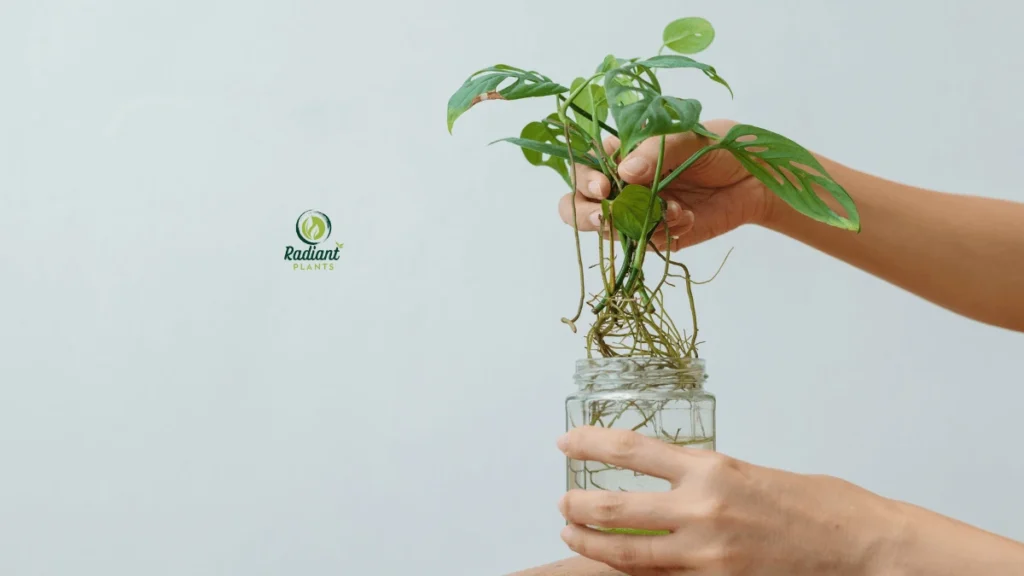
Step 3 – Rooting in Water: How to Do It and How Long It Takes
Water propagation is one of the most popular methods because it’s easy and allows you to see root growth.
Steps:
- Place the cutting in a glass jar filled with filtered or dechlorinated water.
- Ensure the node is fully submerged, but leaves remain above water.
- Place the jar in bright, indirect light.
Timeline: Roots typically appear in 2–4 weeks. Change the water weekly to prevent bacteria buildup.
According to plant experts at The Spruce, water-propagated Monstera adapt well when later transferred into soil, provided the roots are at least 2 inches long. If you’re looking for the easiest way to propagate Monstera, water is the most beginner-friendly choice.
Step 4 – Rooting in Soil: Ideal Conditions and Care
If you prefer to skip the water stage, cuttings can root directly in soil. This method often results in sturdier plants, as roots adapt immediately to their growing medium.
Best conditions for soil propagation:
- Use a well-draining mix (equal parts peat, perlite, and bark).
- Keep the soil evenly moist but not soggy.
- Maintain warm temperatures (68–75°F / 20–24°C).
- Provide bright, indirect light.
Roots may take slightly longer—usually 4–6 weeks—to establish in soil. Some growers use rooting hormone to speed up the process and reduce the risk of cutting failure.
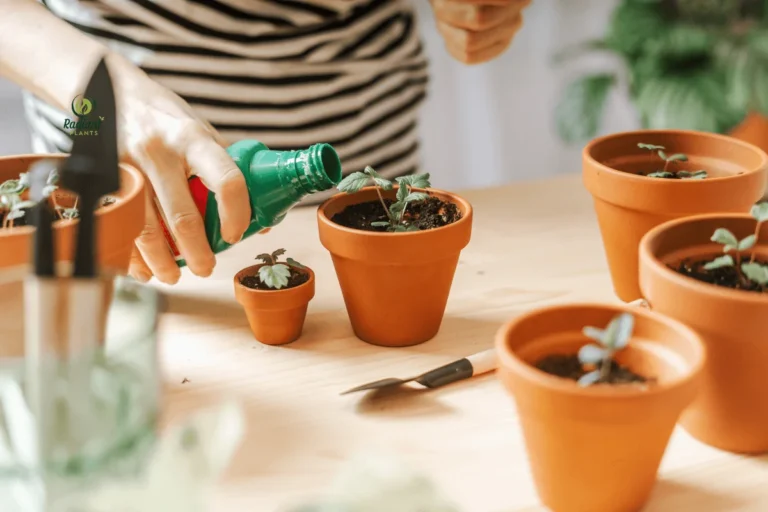
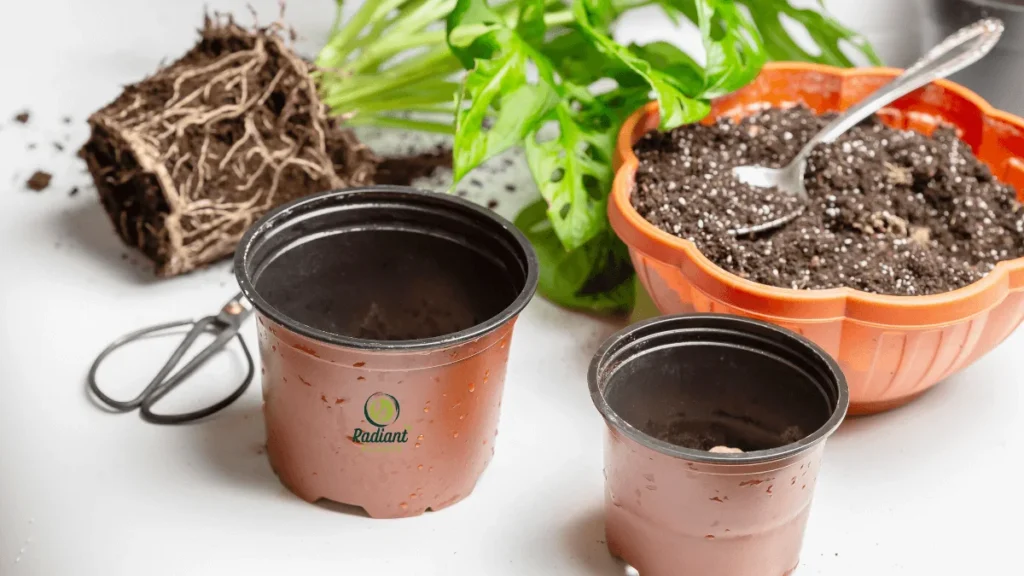
Step 5 – Transplanting Rooted Cuttings into Pots
Once roots reach 2–3 inches, the cutting is ready to be moved into a permanent pot.
Steps to transplant:
- Choose a pot with drainage holes to avoid root rot.
- Fill with Monstera-friendly soil mix (peat, perlite, bark).
- Place the rooted cutting in the center and gently cover the roots.
- Water lightly and allow the plant to acclimate.
📌 Trust Tip: Avoid overwatering during the first few weeks. Newly rooted Monstera are delicate and can easily develop rot if the soil stays too wet.
Key Takeaway
By following this step-by-step process, you’ll master how to propagate Monstera whether you choose water or soil. Clean cuts, patience during rooting, and proper transplanting care are the keys to success. Once you gain experience, you’ll find propagating new Monstera plants becomes second nature.
Alternative Propagation Methods
While water and soil propagation are the most common ways to multiply your Monstera, there are alternative propagation methods that can be highly effective for certain plants or situations. Learning how to propagate Monstera using these techniques gives you flexibility and increases your success rate with challenging specimens. Two popular alternative methods are air layering and dividing mature plants. Both require more care and attention but can produce robust, healthy new plants.
Air Layering Technique Explained
Air layering is a propagation method that allows a Monstera stem to develop roots while still attached to the mother plant. This method is particularly useful for larger stems or plants that are difficult to root from cuttings.
Steps to air layer your Monstera:
- Select a healthy stem with at least one node.
- Make a small upward cut on the stem about one-third of the way through.
- Apply rooting hormone to the wound to encourage root growth.
- Wrap the wounded area with moist sphagnum moss and cover it with plastic wrap to retain humidity.
- Secure the plastic wrap with twist ties or string.
- After 4–6 weeks, check for roots forming inside the moss.
Once the roots are visible and healthy, cut the stem below the new root ball and plant it in soil.
📌 Expert Tip: According to The Spruce, air layering can improve survival rates for Monstera cuttings up to 20% compared with traditional methods. It’s also favored by professional horticulturists for propagating rare or mature plants without stressing the parent plant.
Air layering allows continuous nutrient flow from the parent plant, so the cutting develops stronger roots and is less prone to failure. It’s an excellent technique for growers looking to expand their collection without removing large sections of the plant at once.
Dividing Mature Plants (When and How)
Dividing mature Monstera plants is another effective propagation strategy. This is especially useful when your plant has grown large or developed multiple stems that can each grow independently.
Steps for dividing a Monstera:
- Carefully remove the plant from its pot.
- Gently separate the root ball into smaller sections, ensuring each section has at least one stem and healthy roots.
- Trim any damaged or rotten roots.
- Plant each division into its own pot with well-draining soil.
- Water lightly and place in bright, indirect light.
📌 Trust Tip: Only divide Monstera plants during their active growing season (spring or early summer). Doing so in winter may stress the plant and reduce survival rates.
Dividing plants allows you to rejuvenate older Monstera while creating multiple new plants for your home or to share with friends. Many experienced growers use this method to manage large collections efficiently while keeping plants healthy.
Key Takeaway
Alternative propagation methods like air layering and plant division offer versatile ways to propagate Monstera beyond traditional water and soil techniques. Air layering encourages stronger root development while still attached to the parent plant, and dividing mature plants provides multiple new specimens while revitalizing older growth. By mastering these methods, you expand your propagation toolkit and increase your chances of success in producing thriving Monsteras.
Common Mistakes to Avoid When Propagating Monstera
Even experienced plant enthusiasts can stumble when learning how to propagate Monstera. Avoiding common mistakes ensures your cuttings develop healthy roots and grow into thriving plants. According to the Royal Horticultural Society (RHS), most Monstera propagation failures result from improper cutting selection, watering, lighting, or tool hygiene. By understanding these pitfalls, you can increase your success rate and enjoy a flourishing indoor jungle.
Using a Cutting Without a Node
A cutting without a node cannot develop roots, making it one of the most common propagation mistakes.
- Why nodes matter: Nodes are where roots and new growth emerge. Without them, the cutting will fail to establish itself.
- Expert advice: The University of Florida Extension highlights that successful Monstera propagation requires at least one node per cutting.
📌 Tip: Always select a healthy stem with a visible node and, if possible, an aerial root to boost your success when learning how to propagate Monstera.
Overwatering or Stagnant Water Issues
Water propagation is popular, but overwatering or leaving water stagnant can harm your cutting.
- Risks: Stagnant water encourages bacterial or fungal growth, which can rot the stem or roots.
- Best practice: Change the water every 5–7 days and use filtered or dechlorinated water. Ensure cuttings are partially exposed to air to prevent leaf submersion.
The Spruce notes that maintaining clean water and proper hydration is key to successful Monstera rooting. Following these guidelines significantly reduces failure rates.
Propagating in Low Light Conditions
Low light slows growth and increases the likelihood of cutting failure.
- Light needs: Monstera require bright, indirect light to fuel root development. Direct sunlight may scorch leaves, while dim locations hinder growth.
- Practical tip: Place cuttings near an east or north-facing window, or use a grow light if natural light is insufficient.
According to horticultural experts, providing adequate light increases rooting speed by 20–30% compared to low-light conditions, making it a critical factor in learning how to propagate Monstera successfully.
Ignoring Sterilization of Tools
Using dirty or unsterilized scissors or shears can introduce bacteria and fungi, leading to cutting failure.
- Why it matters: Contaminated tools spread pathogens between plants, which can cause rot or infection.
- Best practice: Clean blades with rubbing alcohol or a 10% bleach solution before making cuts.
📌 Pro tip: Wiping tools between each cutting prevents cross-contamination and ensures your propagation efforts succeed. Experts from the RHS emphasize sterilization as a key step in responsible plant care.
Key Takeaway
Many Monstera propagation failures are preventable. By selecting cuttings with nodes, avoiding overwatering, providing sufficient light, and sterilizing tools, you set yourself up for propagation success. Understanding these common mistakes is essential for anyone learning how to propagate Monstera efficiently, ensuring healthy, vibrant plants that thrive for years to come.
Aftercare Tips for Healthy Growth
Once you’ve successfully taken a cutting, knowing how to propagate Monstera is only half the battle. Proper aftercare ensures your new plant establishes strong roots, grows vibrant foliage, and thrives long-term. According to the Royal Horticultural Society (RHS), post-propagation care is crucial because young cuttings are delicate and prone to stress from improper lighting, water, or nutrition. Below are the key steps to ensure healthy growth after propagation.
Best Lighting for New Cuttings
Light plays a critical role in root development and overall plant health.
- Bright, indirect light: Place cuttings near an east- or north-facing window. Direct sunlight can scorch leaves, while low light slows root growth.
- Artificial lighting: If natural light is limited, LED grow lights provide the consistent illumination needed for root and leaf development.
- Expert insight: Horticulturists from The Spruce recommend providing at least 12–14 hours of bright, indirect light per day during early growth stages.
💡 Tip: Rotate your pot every few days to ensure even light exposure and balanced growth for young Monsteras.
Watering Routine and Humidity Needs
Proper watering and humidity are essential for newly propagated Monstera.
- Watering: Keep the medium consistently moist but not soggy. Overwatering or leaving stagnant water in jars can cause root rot. For soil propagation, water when the top 1–2 inches of soil feel dry.
- Humidity: Monstera are tropical plants; aim for 60–80% humidity. Using a humidity tray or misting occasionally can accelerate root and leaf development.
- Trust Tip: According to the University of Florida Extension, high humidity encourages faster root establishment and healthier foliage in tropical cuttings.
💡 Practical tip: Cover water-propagated cuttings loosely with a plastic bag to maintain humidity while allowing air circulation to prevent mold.
When to Fertilize Young Monstera Plants
Young Monsteras need nutrients once roots are established to support foliage growth.
- Timing: Wait until roots are at least 2–3 inches long before fertilizing. Fertilizing too early can stress the cutting.
- Type of fertilizer: Use a balanced, water-soluble fertilizer at half the recommended strength. Organic options like fish emulsion or seaweed extract are also effective.
- Frequency: Feed every 4–6 weeks during the active growing season (spring and summer). Reduce or stop fertilizing during fall and winter when growth slows.
📌 Expert insight: The RHS emphasizes that careful, moderate fertilization helps young plants build strong root systems without overwhelming them with nutrients.
Key Takeaway
Knowing how to propagate Monstera is just the beginning. Proper aftercare—including optimal lighting, consistent watering with adequate humidity, and timely fertilization—ensures your new cuttings grow into healthy, thriving plants. By paying attention to these factors, you set your Monstera up for long-term success and enjoy vibrant, lush foliage in your home or garden.
Troubleshooting Failed Cuttings
Even with careful preparation, sometimes cuttings fail to root or show signs of distress. Understanding how to propagate Monstera includes knowing how to troubleshoot issues when things go wrong. By identifying common problems such as slow rooting, rot, or weak growth, you can take corrective steps to save your cutting and improve future propagation success. According to the Royal Horticultural Society (RHS), timely intervention can increase recovery rates for struggling cuttings by up to 30%.
Why Roots Aren’t Forming
If roots are not appearing after 2–4 weeks in water or soil, several factors may be responsible:
- Insufficient node contact: Roots only grow from nodes, so a cutting without a healthy node will fail.
- Low light: Cuttings require bright, indirect light; low light slows root formation.
- Temperature: Root development is optimal at 68–75°F (20–24°C). Cooler temperatures can delay or prevent rooting.
- Solution: Ensure your cutting has a node, is placed in appropriate light, and maintain stable, warm conditions.
📌 Expert Tip: The Spruce recommends checking cuttings weekly for root growth and adjusting care rather than leaving them unattended.
Dealing with Rot and Fungus
Rot and fungal infections are common reasons why Monstera cuttings fail.
- Symptoms: Brown, mushy stems; foul smell; water turning cloudy.
- Prevention: Use sterilized tools, clean containers, and change water regularly for water propagation.
- Treatment: Remove affected parts of the cutting, rinse healthy sections, and place them in fresh, clean water or soil. Fungicides can be applied carefully if necessary.
📌 Trust Tip: According to the University of Florida Extension, keeping cuttings dry above the node and avoiding overwatering significantly reduces the risk of rot.
Reviving Weak or Drooping Cuttings
Sometimes cuttings appear weak, limp, or droopy, even if roots are forming.
- Causes: Stress from overwatering, low humidity, or temperature fluctuations.
- Action steps:
- Trim damaged or yellow leaves to redirect energy to root development.
- Increase humidity using a clear plastic cover or humidity tray.
- Provide consistent, bright, indirect light without direct sun exposure.
- Ensure the cutting is supported so leaves are not submerged in water.
💡 Practical Example: A grower reported reviving a drooping Monstera cutting by transferring it from stagnant tap water to filtered water in a sunny window, and new roots appeared within two weeks.
Key Takeaway
Troubleshooting is a crucial part of learning how to propagate Monstera. By recognizing the signs of non-rooting, rot, or weakness, and applying corrective measures like adjusting light, temperature, and water hygiene, you can save many struggling cuttings. Understanding these solutions builds confidence and improves long-term success for both beginner and experienced plant propagators.
FAQ – How to Propagate Monstera
1. What is the easiest way to propagate Monstera?
The easiest way to propagate Monstera is through water propagation. Simply take a cutting with at least one node and an aerial root, place it in clean water, and keep it in bright, indirect light. Roots usually appear in 2–4 weeks, after which you can transplant into soil.
2. How long does it take for Monstera cuttings to root?
Monstera cuttings typically take 2–6 weeks to root, depending on the method and conditions. Water propagation may show roots in 2–4 weeks, while soil propagation can take 4–6 weeks. Proper light, warmth, and humidity speed up rooting.
3. Why isn’t my Monstera cutting growing roots?
Roots may not form if the cutting lacks a node, is exposed to low light, or suffers from overwatering or temperature stress. Ensuring a healthy node, bright indirect light, and stable, warm conditions helps cuttings develop strong roots.
4. When is the best time to propagate Monstera?
The best time to propagate Monstera is during the active growing season, usually spring or early summer. Warmer temperatures and increased daylight promote faster root development and increase the chances of successful propagation.
5. Can I propagate Monstera from a leaf cutting?
No, Monstera cannot be propagated from just a leaf. Cuttings must include at least one node, as roots and new growth emerge from nodes. Including an aerial root further improves the success rate.
6. What are common mistakes when propagating Monstera?
Common mistakes include using cuttings without a node, overwatering, placing cuttings in low light, and failing to sterilize tools. Avoiding these errors increases the likelihood of healthy roots and thriving new plants.
Learning how to propagate Monstera doesn’t have to be complicated. By choosing healthy cuttings, providing the right light, water, and humidity, and avoiding common mistakes, you can successfully grow vibrant new plants. Whether you prefer water propagation, soil rooting, or alternative methods like air layering, proper care ensures a thriving Monstera. Start experimenting with your own cuttings today, and watch your indoor jungle flourish! 🌿
CTA: Check out our full guide on Monstera care tips to keep your new plants healthy and happy.