In brief: How to Identify and Fix Common Plant Problems
- Identify symptoms first: leaves, soil, pests, or growth changes
- Yellow leaves usually mean overwatering or poor drainage
- White powder or spots often indicate a fungal infection
- Sticky leaves or webs signal pests like aphids or mites
- Fix issues fast by adjusting water, light, or treatment
- Prevent problems with proper watering, light, and airflow
Plant problems are usually caused by incorrect watering, poor light, pests, fungal issues, or poor soil conditions. To identify the cause, check the leaves, soil moisture, and recent changes in the plant’s environment. Once diagnosed, most plant problems can be fixed by adjusting care, treating the issue, and improving growing conditions.
If your plant suddenly develops yellow leaves, spots, or starts drooping, you need to identify the cause fast—because the wrong fix can make the problem worse. Most plant problems look similar at first, but each one requires a different solution. This guide helps you diagnose the issue quickly and apply the right fix with confidence.
In This Article
How to Identify Plant Problems in 30 Seconds
Most plant problems can be narrowed down quickly by checking three things: what the plant looks like, what the soil feels like, and whether anything has recently changed in its environment. In practice, the fastest diagnosis comes from matching the visible symptom to the root condition underneath it instead of guessing based on one clue alone.
Before you try any fix, pause and do a 30-second diagnosis. This matters because the same symptom can point to very different causes. Yellow leaves, for example, can mean overwatering, underwatering, low light, transplant stress, or normal aging. Treating the wrong cause often makes the problem worse.
Quick Diagnosis Box: Use the 3S Framework
Use this simple method to identify plant problems fast:
1. See
Look at the visible symptoms.
- Are the leaves yellow, brown, drooping, curling, spotted, or sticky?
- Is the damage on old leaves, new leaves, or all over the plant?
- Do you see webbing, tiny bugs, white fuzz, or black specks?
2. Soil
Check what is happening below the surface.
- Is the soil soggy, damp, dry, compacted, or moldy?
- Does it smell fresh, sour, or rotten?
- Are the roots likely to stay wet too long because of poor drainage?
3. Setup
Think about the plant’s environment and any recent changes.
- Has the plant been moved?
- Is it getting less light than usual?
- Did you recently repot, fertilize, or water more often?
- Is the air especially dry or cool right now?
based on real cases, we’ve found that beginners usually look only at the leaves and skip the soil check. That is one of the biggest reasons indoor plant problems get misdiagnosed. A drooping plant with dry soil needs something very different from a drooping plant in wet, cold soil.
Quick Checklist: What to Check First
Run through this in order:
- Color change: yellowing, browning, bleaching, or white residue
- Texture: crispy, limp, soft, mushy, or papery leaves
- Leaf pattern: one leaf, lower leaves, new growth, or the whole plant
- Stems: firm or mushy
- Soil moisture: bone-dry, evenly moist, or soggy
- Surface clues: mold, salt buildup, pests, webs, sticky residue
- Recent changes: repotting, relocation, draft, heater, missed watering
That checklist gives you a better answer than a random treatment ever will.
How to Tell Similar Problems Apart
The key is to compare symptom + soil + setup, not symptom alone.
Yellow leaves
- Yellow leaves + soggy soil + soft stems usually point to overwatering or early root problems.
- Yellow leaves + very dry soil + limp plant more often suggest underwatering.
- One or two older yellow leaves only may be normal aging, especially on mature houseplants.
- Yellow leaves after moving the plant may be stress, especially if light levels have changed suddenly.
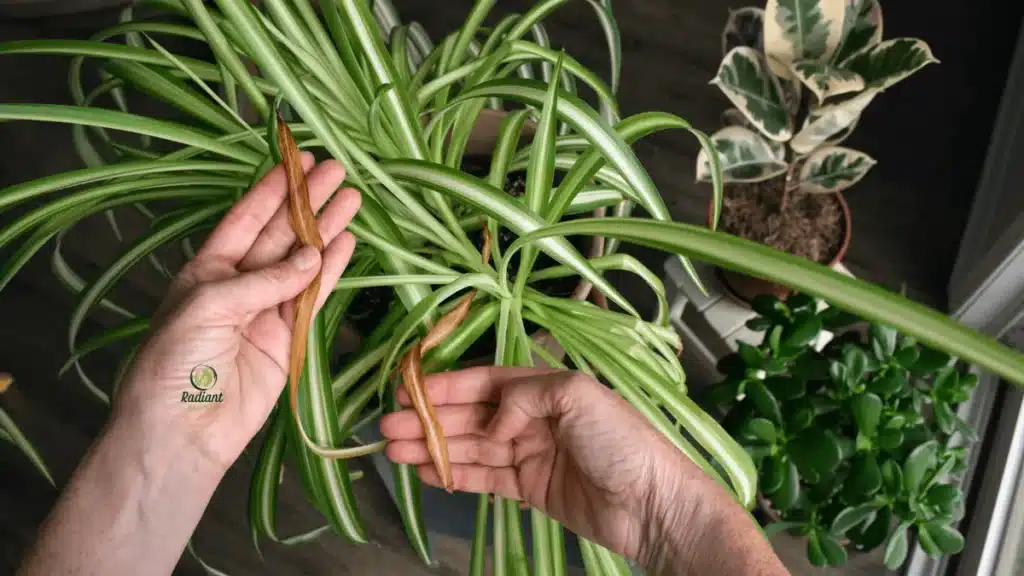
Brown edges or crispy tips
- Crispy brown edges + dry soil often mean drought stress or very low humidity.
- Brown patches on the side facing the window may be sun scorch.
- Brown spots with yellow halos can point more toward disease or leaf spot issues.
Drooping leaves
- Drooping + dry potting mix usually means the plant is thirsty.
- Drooping + wet soil is more concerning because roots may not be taking up water properly.
- Drooping after repotting can be transplant shock rather than a watering issue.
This is one of the most common beginner mistakes: watering again just because the plant looks limp, without checking whether the soil is already wet.
White material on leaves or soil
- White powder on leaves may be powdery mildew.
- White crust on soil is often mineral or fertilizer salt buildup, not disease.
- Cottony clusters near stems may indicate mealybugs rather than fungus.
Sticky leaves or tiny webs
- Sticky leaves often suggest sap-sucking pests such as aphids or whiteflies.
- Fine webbing is a strong clue for spider mites, especially in dry indoor air.
During cooler months, indoor air often becomes drier because of heating, and that can make spider mite issues more likely indoors.
What Actually Works for Fast Diagnosis
When you are short on time, focus on patterns, not perfection.
A quick home diagnosis usually works best like this:
- Look at the leaves first.
- Touch the soil second.
- Think about the last 7 to 10 days.
That last part is important. In real homes, plant problems often start after a change:
- a missed watering
- a darker room
- a cold draft
- a repot
- Fertilizer is applied to stressed roots
- bringing home a new plant with hidden pests
If your pothos suddenly yellows after being moved away from a bright window, that context matters. If your peace lily droops but the soil is soaked and smells foul, the problem is probably not thirst. If your calathea has brown tips right after the heat comes on for winter, dry air is a more likely clue than disease.
What Often Fails
A few common habits make diagnosis harder:
- Treating every yellow leaf as overwatering
- spraying for pests without checking for actual insects
- watering on schedule instead of checking the potting mix
- Assuming white residue is always fungus
- repotting immediately before confirming the cause
The better approach is simple: diagnose first, treat second. That gives you a much better chance of fixing plant problems without stressing the plant even more.
Quick Plant Problem Diagnosis Table
Most plant problems can be narrowed down by matching the symptoms with the soil condition and recent care. Use this table as a fast diagnosis tool, then confirm the cause before treating anything—especially when two problems can look almost identical.
Symptom | Likely Cause | How to Tell the Difference | Quick Fix |
|---|---|---|---|
Soil stays wet for days, lower leaves yellow first, stems may feel soft | Pause watering, improve drainage, empty saucers, and check roots if decline continues | ||
Yellow leaves | Underwatering | Soil feels dry deep in the pot, leaves look limp or papery, pot feels very light | Water thoroughly until excess drains out, then resume watering by soil dryness |
Brown crispy tips | Low humidity or inconsistent watering | Tips are dry and brittle, not mushy; often worse in winter indoors | Increase humidity, water evenly, and keep away from heating vents |
Leaf spot disease, sun scorch, or physical damage | Disease often forms defined spots; sun scorch appears on exposed sides; damage may be random | Remove badly damaged leaves, adjust light, and avoid wet foliage if disease is suspected | |
White powder on leaves | Looks like dust or flour on leaf surfaces, often spreads across multiple leaves | Isolate the plant, improve airflow, remove affected leaves, and apply an appropriate treatment | |
Crust sits on the soil surface or the pot rim rather than on the leaves | Salt or mineral buildup | Crust sits on the soil surface or the pot rim rather than on the leaves | Flush the soil thoroughly, reduce fertilizer frequency, and use filtered water if needed |
Constant moisture and poor airflow | Fuzzy growth stays mostly on the soil surface, often with a persistently wet mix | Scrape off the top layer, let the soil dry more between waterings, and improve airflow | |
Wilting or drooping | Thirst | Soil is dry, plant perks up after a deep watering | Water fully, then adjust the routine based on how fast the soil dries |
Wilting or drooping | Root stress from overwatering | Soil is wet, the plant stays limp after watering, and the roots may smell sour | Stop watering, improve aeration, and inspect roots if symptoms persist |
Mushy stems or foul smell | Roots may be dark, soft, or smelly; decline continues even in wet soil | Trim rotted roots, repot in fresh, well-draining mix, and sanitize tools | |
Sticky leaves | Aphids, whiteflies, or scale | Leaves feel tacky; you may also see insects or shiny honeydew | Isolate the plant, rinse foliage, treat pests thoroughly, and repeat as needed |
Fine webbing | Very thin webbing near leaf joints, speckled leaves, worse in dry indoor air | Isolate the plant, rinse leaves well, raise humidity slightly, and treat repeatedly | |
Tiny flies around the soil | Fungus gnats | Adults hover near the pot; larvae thrive in consistently damp soil | Let the top layer dry more, use sticky traps, and reduce chronic overwatering |
Curling leaves | Water stress, pests, or heat stress | Check the soil first, then inspect the leaf undersides for pests, then review light and airflow | Correct the root cause rather than treating the curl itself |
Pale, weak growth | Low light or nutrient deficiency | New growth may be small or stretched; low light often causes legginess, too | Move to brighter indirect light, then review feeding only if growth remains weak |
How to Use This Table Correctly
This table works best as a first filter, not a final diagnosis. The biggest mistake beginners make is treating the symptom rather than identifying the cause. Yellow leaves are the classic example: they can mean too much water, too little water, stress, or even normal aging. The difference usually lies in soil feel, leaf texture, and the pattern of damage.
At Radiant Plants, we’ve found that one quick habit solves a lot of misdiagnosis: always touch the soil before deciding what the symptom means. A drooping plant in bone-dry soil needs a very different response from a drooping plant in a cold, soggy pot.
What Actually Works in Real Homes
A few practical examples make this easier:
- If your pothos has yellow leaves and wet soil, do not water again just because the leaves look sad. Check drainage first.
- If your peace lily is drooping but the soil is dry and the pot feels light, a full watering is more useful than misting the leaves.
- If your monstera has white residue only on the soil surface, you are probably dealing with buildup, not mildew.
- If you see fine webbing during winter, spider mites are more likely than random leaf damage because dry indoor air often helps them spread.
Quick Diagnosis Tips Competitors Often Miss
These small details help separate similar plant problems faster:
- Crispy = often dry stress
Dry, brittle tissue usually points toward underwatering, low humidity, or heat exposure. - Mushy = often excess moisture
Soft stems, soggy soil, or a sour smell are stronger warnings for overwatering or root rot. - One damaged leaf is not the same as a pattern
A single yellow or damaged leaf may be aging. Multiple affected leaves usually point to a care issue. - Surface clues matter
Sticky residue, webbing, fuzzy growth, and gnats often reveal the cause faster than leaf color alone.
Use the table to narrow the issue down first, then move to the specific fix that matches what you are actually seeing.
Most Common Plant Problems (Symptoms + Fixes)
The most common plant problems indoors usually come down to watering mistakes, fungal issues, pests, poor light, and stress after a change in conditions. The key is to diagnose the pattern first, then use the fix that matches the cause, because the wrong treatment can push an already stressed plant further downhill.
Yellow Leaves on Plants
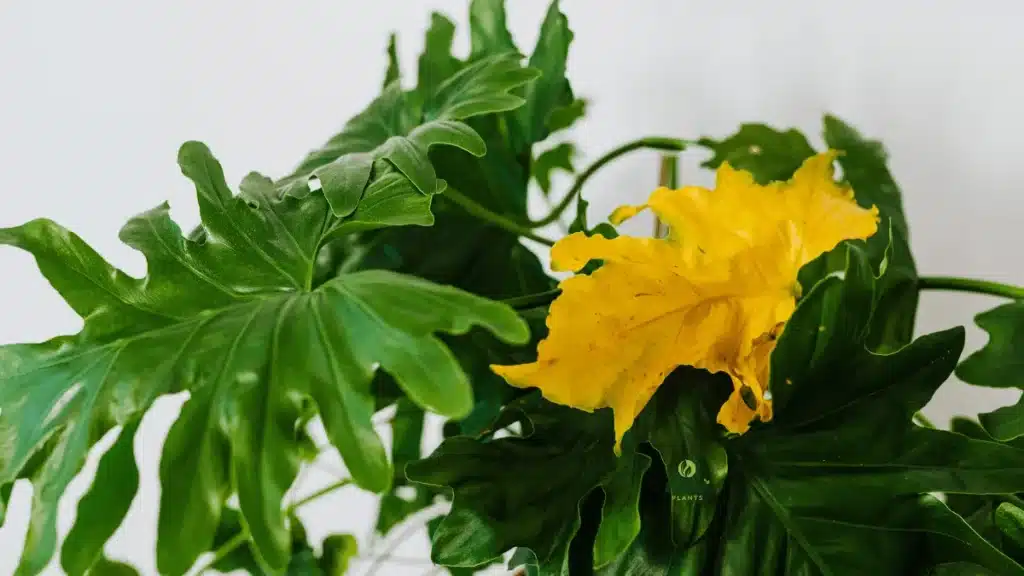
Yellow leaves are one of the most common plant problems, but they are also one of the easiest to misread. In most homes, the main causes are overwatering, poor drainage, low light, transplant stress, or nutrient imbalance.
The fastest way to tell the difference:
- Yellow leaves + wet soil + soft stems usually point to overwatering
- Yellow leaves + dry soil + limp texture often point to underwatering
- Older, lower leaves turning yellow one at a time may be normal aging
- Pale yellow growth across the plant may suggest a nutrient issue or low light
What actually works:
- Check the soil before watering again
- Make sure excess water drains completely
- Move the plant closer to bright indirect light if it has been sitting in a dark corner
- If the plant has been in the same soil for a long time, review feeding and root health
Common beginner mistake: cutting off yellow leaves and assuming the problem is solved. Removing damaged leaves can tidy the plant, but it does not fix the cause.
At Radiant Plants, we’ve found that yellow leaves are often blamed on “not enough water” when the real issue is roots staying wet too long in a dense mix. A pothos in a decorative cachepot, for example, may look thirsty while its nursery pot is actually sitting in trapped water.
Brown Spots on Leaves
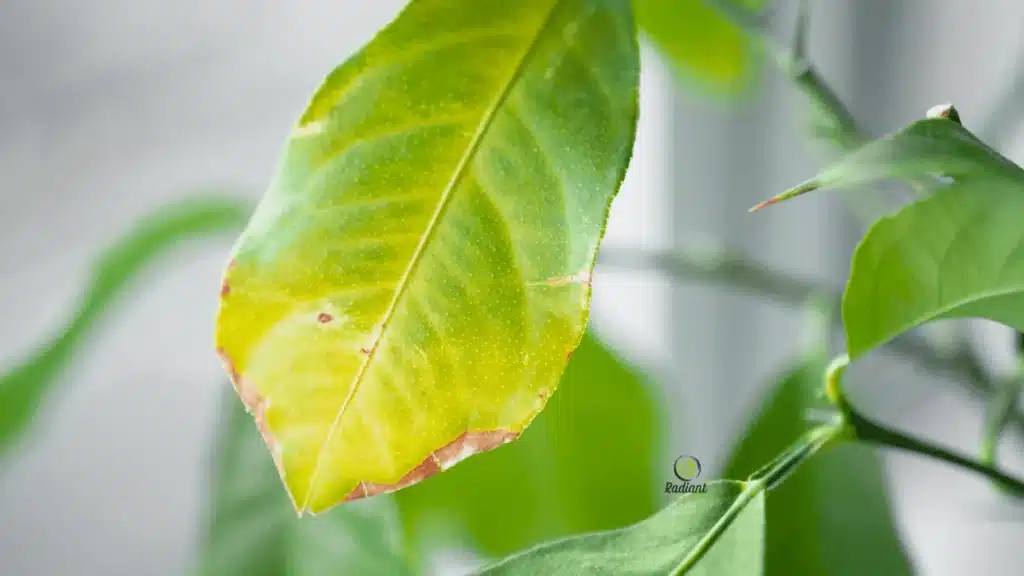
Brown spots usually come from fungal leaf issues, sun scorch, inconsistent watering, physical damage, or salt stress.
How to tell the difference:
- Round or spreading spots with distinct edges are more suggestive of disease
- Irregular dry patches on the window-facing side often look more like sun scorch
- Small brown patches after rough handling may just be physical damage
- Brown spots plus crispy edges can point to water stress rather than infection
Quick fixes:
- Remove badly damaged leaves with clean scissors
- Move the plant out of harsh direct sun if scorch is likely
- Avoid splashing water on foliage if disease is suspected
- Improve airflow around crowded plants
What often fails: spraying random treatments before confirming the cause. If the issue is sunburn, fungicide will not help. If the problem is fungal, moving the plant alone will not solve it.
Real home scenario: a peace lily placed right against a bright south-facing window may develop brown patches that look alarming, but the pattern often tells you it is light-related rather than disease.
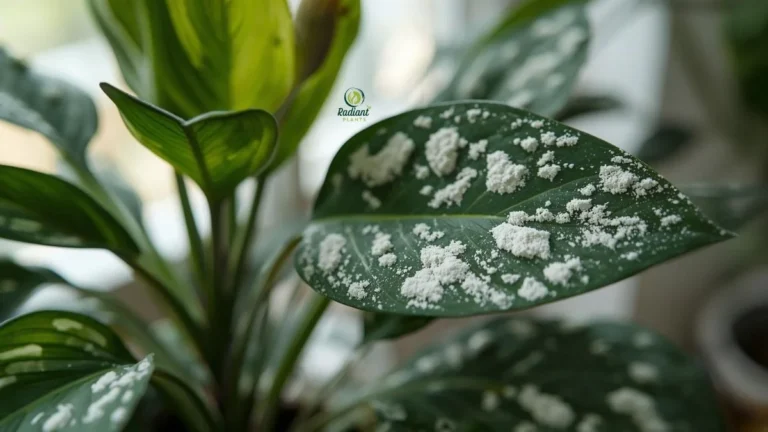
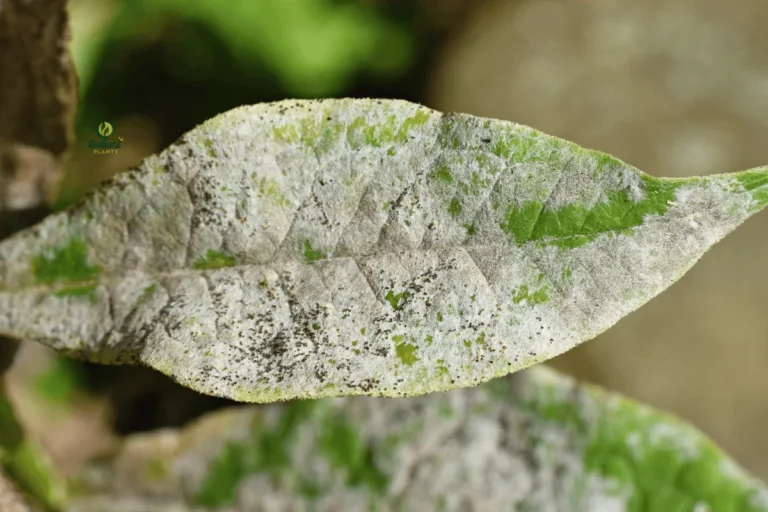
White Spots or Powdery Residue
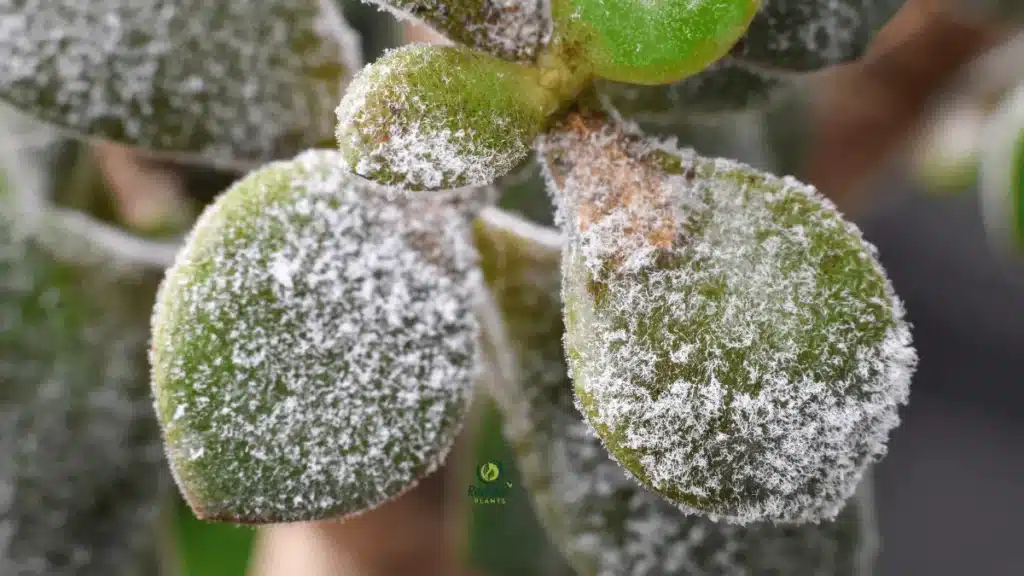
White marks can come from powdery mildew, mineral residue, fertilizer salts, hard-water spotting, or some pest activity.
This is where diagnosis really matters:
- White powder sitting on leaf surfaces can suggest powdery mildew
- White crust mostly on the soil or the pot rim is more likely to be salt or mineral buildup
- Speckled leaves with tiny moving dots or webbing may point to pests instead
- White marks after misting with hard water may simply be residue
Quick fixes:
- Wipe leaves with a damp cloth first to test whether the material lifts off easily
- Improve airflow if mildew is suspected
- Flush the soil if you see fertilizer or mineral buildup
- Isolate the plant if you suspect a spreading fungal or pest issue
Common beginner mistake: assuming every white substance is fungus. In real homes, plain mineral buildup is very common, especially when plants are watered with hard tap water.
At Radiant Plants, we’ve found that the simplest first move is also the most useful: wipe one leaf, inspect the underside, and check whether the residue is on the leaf, in the tissue, or only on the soil surface.
Mold on Soil
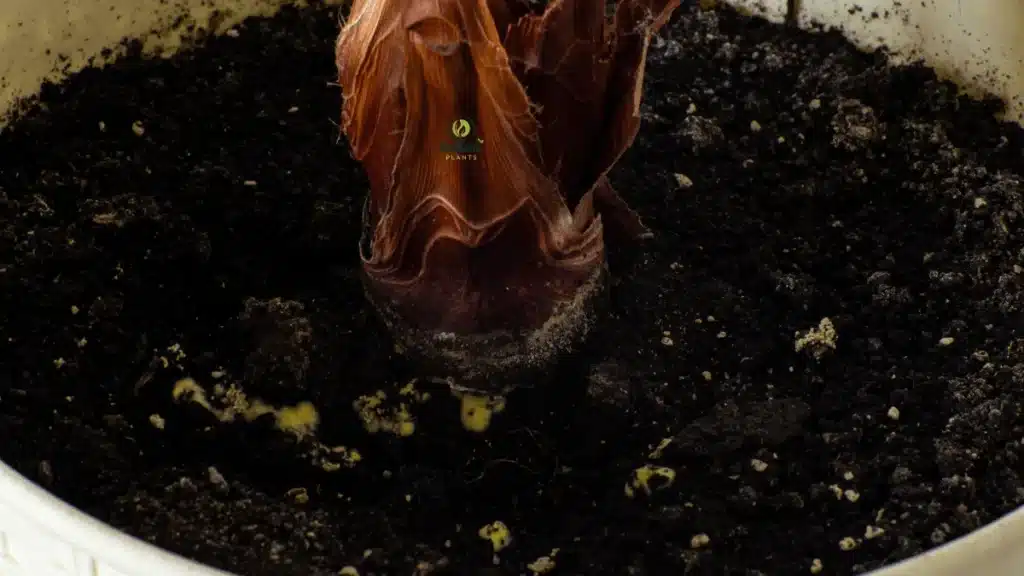
Mold on the soil surface usually shows up when the potting mix stays wet too long, and air movement is poor. It often looks dramatic, but surface mold is not always the same thing as a deeper root problem.
How to tell the difference:
- Fuzzy growth only on top of the soil usually means surface mold
- Mold plus sour smell plus plant decline may suggest a deeper moisture issue
- Tiny flies around the pot can mean the same wet conditions are also encouraging fungus gnats
Quick fixes:
- Remove the top layer of affected soil
- Let the upper soil dry more between waterings
- Increase airflow and light if possible
- Stop watering on a fixed schedule and check the mix first
What actually works: changing the watering rhythm, not just scraping off the mold. If the same soil stays wet week after week, the mold usually returns.
Seasonal note: this problem often shows up more in cooler, darker months when indoor plants use water more slowly.
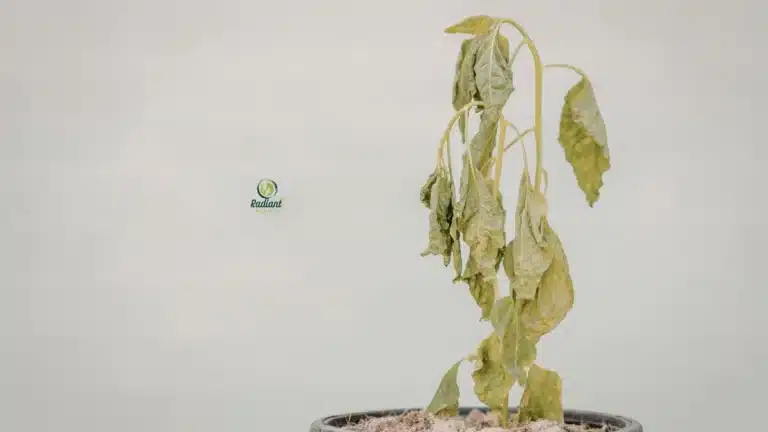
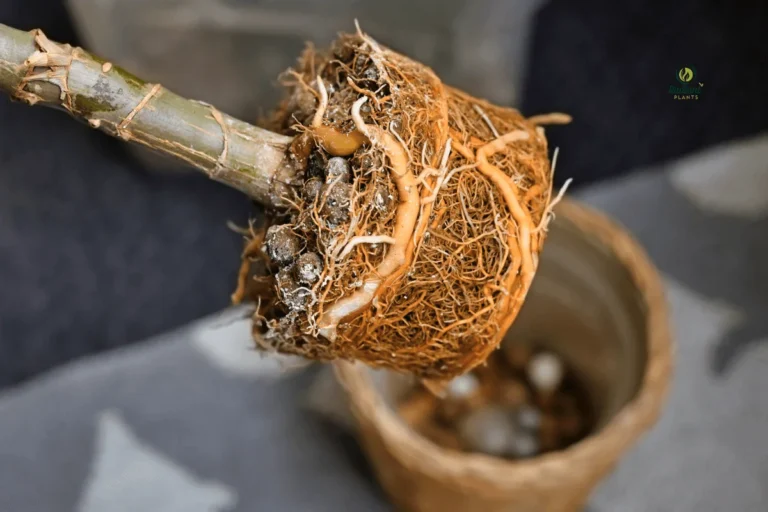
Root Rot
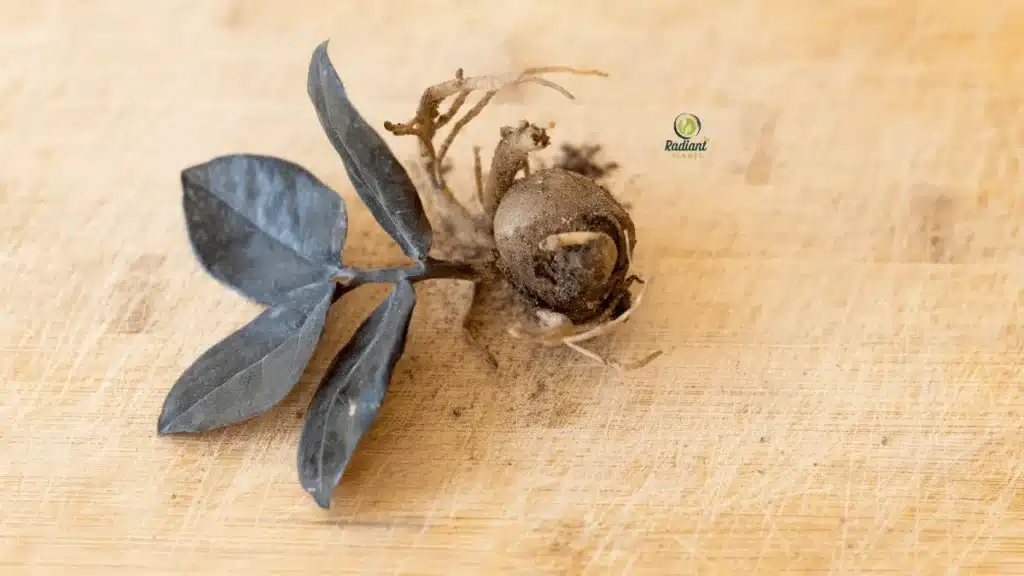
Root rot is one of the most serious plant problems because the damage happens below the surface before the leaves tell the full story. It is most often caused by prolonged excess moisture, poor drainage, or compacted soil that keeps roots from getting enough oxygen.
Typical signs:
- Yellowing or drooping that does not improve after watering
- Wet soil that stays wet for too long
- Mushy stems near the base
- Roots that look dark, soft, or smell foul when checked
Quick fixes:
- Remove the plant from the pot and inspect the roots
- Trim off mushy, blackened roots with clean tools
- Repot into a fresh, well-draining mix
- Reduce watering until the plant begins to stabilize
Common beginner mistake: watering a wilting plant with root rot because it “looks thirsty.” The roots are often too damaged to take up water properly, so more water only increases the stress.
Real home scenario: a snake plant in a pot without drainage may stay wet long after the top looks dry. By the time leaves soften, the root system may already be compromised.
Overwatering Symptoms
Overwatering is not just “too much water.” It is usually a combination of too-frequent watering, low light, slow evaporation, and a mix that stays wet too long. That is why two people can water the same amount, and only one ends up with trouble.
Typical symptoms:
- Yellow leaves
- Soft, limp growth
- Wilting even though the soil is wet
- Moldy soil or fungus gnats
- A heavy pot that never seems to dry out
How to tell it apart from underwatering:
- Overwatered plants often feel soft and heavy, with damp soil
- Underwatered plants usually feel dry, light, and crispier at the edges
Quick fixes:
- Stop watering until the soil reaches an appropriate dryness level for that plant
- Increase the light if the plant is in a dim area
- Empty saucers and outer pots after watering
- Consider repotting if the mix is dense and slow-draining
What often fails: vague advice like “water less.” What works better is watering less often but more intentionally, based on soil dryness, pot size, light, and season.
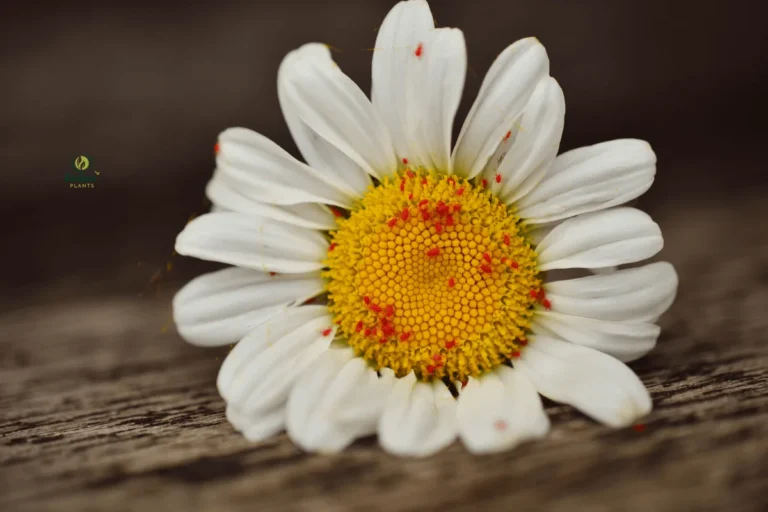
Pests (Aphids, Spider Mites, Whiteflies)
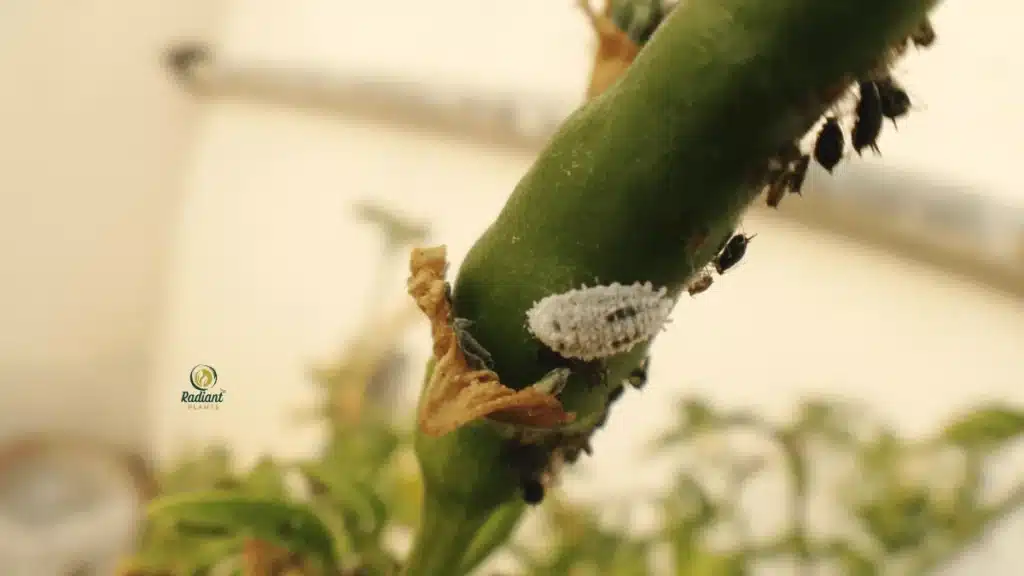
Indoor plant pests usually show up as sticky leaves, fine webbing, leaf distortion, yellow stippling, or tiny flying insects. The three most common troublemakers here are aphids, spider mites, and whiteflies.
How to tell them apart:
- Aphids cluster on soft new growth and leave sticky honeydew
- Spider mites create fine webbing and tiny pale speckles on leaves
- Whiteflies flutter up when the plant is disturbed, and also leave sticky residue
Quick fixes:
- Isolate the affected plant immediately
- Rinse foliage thoroughly, especially leaf undersides
- Repeat treatment instead of assuming one pass is enough
- Inspect nearby plants, not just the one showing damage
At Radiant Plants, we’ve found that the biggest mistake is treating the visible bugs once and stopping too early. Pest control usually works best when it is repeated on a schedule that catches the next wave.
Seasonal note: spider mites often become worse indoors during dry winter conditions, while whiteflies and aphids may appear after bringing new plants into the house.
Plant Shock

Plant shock usually happens after a major change, such as repotting, moving to a new location, temperature swings, or sudden changes in light. It is common, and it often looks worse than it actually is.
Typical signs:
- Drooping after repotting
- Temporary yellowing
- Slowed growth
- Leaf drop after moving the plant
How to tell it apart from a serious problem:
- Shock usually follows a clear recent change
- The soil may be normal rather than soggy or bone-dry
- Symptoms often stabilize instead of rapidly spreading if care is corrected
Quick fixes:
- Keep the plant in stable conditions
- Avoid fertilizing immediately
- Water carefully, not excessively
- Give it time before making more changes
What often fails: repotting again, moving it again, or adding fertilizer too soon. Plants under stress usually recover better with fewer interventions, not more.
Real home scenario: A fiddle leaf fig moved from a bright nursery to a dim hallway may drop leaves within days. That does not automatically mean disease—it often means stress from the abrupt change.
When you look across these common plant problems, a pattern becomes clear: the visible symptom is only the starting clue. The real progress comes from matching that clue with soil condition, environment, and recent changes before choosing a fix.
Problems That Look Similar (Avoid Misdiagnosis)
Many plant problems look alike at first, which is why quick guesses often lead to the wrong fix. The best way to avoid misdiagnosis is to compare the symptoms, soil condition, and recent environment together instead of reacting to the leaf color alone.
A yellow leaf does not automatically mean “water less,” and a brown spot does not automatically mean disease. In real homes, the difference usually comes down to a few small clues that are easy to miss if you only look at the surface.
Quick Comparison Table
Lookalike Problem | What It Looks Like | How to Tell the Difference | What to Do First |
|---|---|---|---|
Overwatering vs Underwatering | Yellowing, drooping, leaf drop | Check soil moisture, leaf texture, and pot weight | Feel the soil before watering again |
Pest Damage vs Fungal Disease | Spots, discoloration, and damaged leaves | Look for insects, webbing, sticky residue, or spot patterns | Inspect leaf undersides and isolate if needed |
Sunburn vs Nutrient Deficiency | Pale patches, browning, faded leaves | Review light exposure and whether damage is localized or widespread | Move the plant only if harsh light is the likely cause |
Overwatering vs Underwatering
This is the most common plant mix-up. Both can cause yellow leaves, drooping, and leaf drop, which is why so many people treat the wrong issue first.
How to tell the difference
Overwatering usually looks like this:
- Soil stays wet for too long
- Leaves feel soft or limp, not crisp
- Stems may feel tender near the base
- Yellowing often starts on older leaves
- The pot feels heavy for days after watering
Underwatering usually looks like this:
- Soil feels dry well below the surface
- Leaves may droop, curl, or feel thin and papery
- Brown crispy edges are more common
- The pot feels unusually light
- The plant perks up after a deep watering
At Radiant Plants, we’ve found that the fastest reality check is to lift the pot. A plant in dry mix often feels surprisingly light, while an overwatered plant feels heavy even when the leaves look tired.
Real home scenario
A peace lily droops dramatically when it is thirsty, but it can also droop when the roots stay too wet. The difference is simple: if the soil is dry and the plant improves a few hours after watering, thirst is the likely problem. If the soil is wet and the plant stays limp, root stress is more likely.
What actually works
Do not respond to drooping with automatic watering. First:
- Feel the soil 1 to 2 inches down
- Check whether the pot has drainage
- Notice whether the leaves are crispy or mushy
- Think about the last few days of care, not just today
Pest Damage vs Fungal Disease
These two are often confused because both can leave spots, discoloration, or damaged-looking leaves. The difference is that pests usually leave signs of feeding, while fungal problems tend to create more defined lesions, patches, or powdery growth.
How to tell the difference
Pest damage often includes:
- Sticky leaves
- Fine webbing
- Tiny insects on stems or leaf undersides
- Speckled or stippled leaf surfaces
- Distorted new growth
Fungal disease often includes:
- Clearly defined spots or blotches
- White powdery coating
- Expanding patches that do not wipe off easily
- Repeated spotting on multiple leaves under humid conditions
A good rule: if you see movement, webbing, or sticky residue, think pests first. If you see powder, spot patterns, or spreading lesions, fungal disease becomes more likely.
Real home scenario
A pothos with pale speckling and tiny webs near the nodes is usually dealing with spider mites, especially in dry, heated rooms. A begonia with powdery white growth on the leaf surface is more likely to be facing mildew. These can both look “dusty” from a distance, but a close check changes everything.
What often fails
Many beginners spray fungicide before checking for pests, or use insecticidal soap on a fungal problem. That wastes time and stresses the plant further. The better first move is to inspect:
- leaf undersides
- stem joints
- the top and bottom of affected leaves
- nearby plants for spreading
Sunburn vs Nutrient Deficiency
These can both cause pale, brown, or patchy leaves, but the pattern is different. Sunburn usually damages the part of the plant exposed to intense direct light, while nutrient deficiency tends to show up as a broader growth problem across the plant or in specific old or new leaves, depending on the nutrient involved.
How to tell the difference
Sunburn usually looks like:
- Bleached, tan, or dry patches
- Damage on the side facing the window or sun
- Sudden appearance after moving a plant into stronger light
- Localized damage rather than uniform decline
Nutrient deficiency usually looks like:
- General paleness or slow growth
- Repeated yellowing patterns
- Smaller or weaker new leaves
- Symptoms that continue even without harsh light exposure
At Radiant Plants, we’ve found that a simple question often clears this up fast: Did anything change with light recently? If the answer is yes, and the damage is concentrated on the exposed side, sun stress becomes much more likely than a deficiency.
Real home scenario
A snake plant moved from a dim shelf to a hot south-facing window may develop pale scorched patches within days. That is very different from a plant that has stayed in the same light for months but is producing weak, washed-out growth.
What actually works
Before reaching for fertilizer:
- Review recent light changes
- Look at where the damage sits on the plant
- Check whether the issue is isolated or widespread
- Consider whether the plant has been actively growing or stalled
Fertilizing a sun-stressed or dehydrated plant often makes recovery harder instead of easier.
Warning Box: Do Not Treat the Symptom Alone
Do not water, fertilize, or spray based on leaf appearance alone.
A drooping plant may need water, or it may be sitting in soggy roots. A spotted leaf may have sun damage, fungus, or pests. The safest first move is always to confirm the cause with at least two clues: one visible symptom and one supporting clue from the soil, setup, or pest check.
A Better Way to Diagnose Similar Plant Problems
This is where many competing articles stay too broad. What actually improves diagnosis is combining three clues:
- Leaf clue: yellowing, spots, curling, powder, webbing
- Soil clue: dry, damp, soggy, sour-smelling, moldy
- Set up clue: recent move, draft, repotting, stronger sun, lower winter light
That combination usually gives you a much more accurate answer than one symptom ever can.
For example:
- Yellow leaves + soggy soil + heavy pot = overwatering is more likely
- Brown spots + direct afternoon sun = scorch is more likely
- Leaf speckling + fine webbing = spider mites are more likely
- White coating + poor airflow = fungal issues are more likely
When plant problems seem contradictory, the issue is often not that the plant is “showing the wrong symptom.” It is that multiple clues need to be read together before the right fix becomes obvious.
How to Fix Plant Problems Step-by-Step
To fix plant problems, start by confirming the cause before you change anything. The right response usually follows the same order: identify the issue, separate the plant if it may spread, correct watering, treat pests or fungus if present, and repot only when the roots or soil are part of the problem.
A lot of plant damage gets worse because people skip straight to treatment. Watering more, spraying everything, or repotting immediately can all backfire if the diagnosis is wrong. What works better is a calm, targeted response.
Step 1: Identify the Real Problem First
Before you try to fix anything, match the symptom to at least one supporting clue.
Use this quick checklist:
- Check the leaves: yellowing, spots, curling, webbing, sticky residue, powder
- Check the soil: dry, damp, soggy, moldy, compacted, foul-smelling
- Check the setup: recent move, repotting, low light, heating vent, direct sun, missed watering
- Check the pattern: one leaf, lower leaves, new growth, or the whole plant
This matters because many common plant problems look similar at first:
- Yellow leaves + soggy soil often point to overwatering
- Yellow leaves + dry, lightweight pot more often point to underwatering
- A white coating that wipes off the soil surface may be mineral buildup
- White powder spreading across leaves is more suspicious of mildew
At Radiant Plants, we’ve found that the fastest way to avoid a wrong fix is to ask one simple question: What changed recently? A plant that declined right after repotting, moving, or entering winter light conditions often needs a different response than a plant that has been struggling for weeks.
Step 2: Isolate the Plant If the Problem Could Spread
If you suspect pests or disease, move the plant away from others right away. This is especially important for spider mites, aphids, whiteflies, mildew, and some leaf diseases, which can spread faster than most beginners expect.
Isolate the plant when you see:
- fine webbing
- sticky leaves
- flying white insects
- clusters of bugs on new growth
- powdery growth on leaves
- spreading spots on multiple leaves
What actually works:
- Move the plant to a separate room or at least several feet away
- Avoid brushing leaves against nearby plants
- Wash your hands and tools after handling them
- Inspect plants sitting next to it, not just the one with visible damage
Common beginner mistake: treating one infested plant and ignoring the plants beside it. In real homes, pests often show up on the “clean” plant a week later because they were already there.
Step 3: Adjust Watering Based on the Root Cause
Do not “water less” or “water more” in a vague way. Adjust watering based on what the soil and roots are actually telling you.
If the plant is overwatered
Look for:
- wet soil that stays wet too long
- yellow leaves
- limp, soft growth
- mold on the soil
- fungus gnats
- sour smell near the pot
What to do:
- Stop watering until the plant reaches an appropriate dryness level
- Empty any saucer or outer pot holding standing water
- Move the plant into brighter indirect light if possible
- Improve airflow around the pot
- Consider repotting only if the soil is dense, swampy, or the roots are already declining
If the plant is underwatered
Look for:
- dry soil that pulls away from the pot
- drooping with crisp edges
- lightweight pot
- leaves that feel thin or papery
What to do:
- Water thoroughly until excess drains from the bottom
- Let the soil rehydrate fully
- Resume watering based on soil dryness, not the calendar
- For very dry soil that resists water, re-wet gradually instead of splashing a little on top
What often fails: giving small “sips” of water to a fully dry root ball. That often wets only the surface and leaves the center dry.
Real home scenario: a pothos in a warm, bright room may dry far faster than the same plant in a dim corner. The species matters, but the setup matters just as much.
Step 4: Treat Pests or Fungus With the Right Method
Once you confirm that pests or fungus are involved, use a treatment that matches the problem instead of applying everything at once.
For pests
Common clues:
- sticky residue
- distorted new leaves
- fine webbing
- insects clustered on stems or leaf undersides
- tiny flies near the soil
What to do:
- Isolate the plant
- Rinse the foliage thoroughly, especially the undersides
- Remove heavily infested leaves if needed
- Apply the appropriate treatment consistently, not just once
- Recheck every few days
At Radiant Plants, we’ve found that consistency matters more than intensity. One heavy treatment followed by inattention usually works worse than repeated, careful follow-up.
For fungus or mildew
Common clues:
- powdery white coating
- repeating leaf spots
- spreading lesions in humid, crowded conditions
What to do:
- Remove badly affected leaves with clean tools
- Improve airflow
- Keep foliage dry if overhead watering is contributing
- Apply a suitable treatment only after confirming the issue
- Monitor nearby plants
Common beginner mistake: treating fungal-looking symptoms without checking for pests first. A spider mite infestation can leave damage that looks dusty or patchy from a distance.
Step 5: Repot Only If the Soil or Roots Need It
Repotting can help, but it is not the answer to every plant problem. In fact, unnecessary repotting is one of the fastest ways to add stress to a plant that is already struggling.
Repot when:
- The soil stays wet for too long and drains poorly
- roots are mushy, dark, or foul-smelling
- The mix has broken down and become compacted
- The root ball is so crowded that water runs straight through without soaking in
- The current pot has no drainage, and the plant is declining
What to do:
- Gently remove the plant from the pot
- Inspect the roots before deciding
- Trim rotted roots with clean scissors if needed
- Replace old mix with fresh, well-draining soil
- Use a pot with drainage holes
- Water lightly after repotting unless the plant was extremely dry
What often fails: repotting into a much larger pot. That usually means more wet soil around fewer roots, which can slow recovery instead of helping it.
Real home scenario: if your snake plant has soft roots and sits in dense, wet soil, repotting can be the right move. If your calathea is simply stressed from a recent move, repotting may make things worse.
Quick Action Checklist
When your plant suddenly looks unwell, follow this order:
- Confirm the symptom and check the soil
- Review any recent changes in light, location, or watering
- Isolate the plant in case pests or disease may spread
- Correct watering based on actual soil moisture
- Treat only the confirmed issue
- Repot only if the roots, soil, or drainage are part of the problem
- Monitor for several days before making another major change
Expert Tips That Save Plants Faster
A few details make a big difference:
- Do one major correction at a time.
If you change water, light, soil, and fertilizer all at once, you will not know what helped or harmed. - Watch for response, not instant perfection.
Damaged leaves may not recover, but new growth often tells you whether the plant is improving. - Do not fertilize a stressed plant too early.
Fertilizer can add pressure to damaged roots or stressed foliage. - Adjust for season.
In winter, many indoor plants use water more slowly because of lower light and cooler indoor conditions. That is why the same watering routine that worked in summer can suddenly create problems.
The goal is not to react quickly to every symptom. The goal is to respond accurately enough that the plant can recover without added stress.
How to Prevent Plant Problems (Long-Term Care)
The best way to prevent plant problems is to make care more consistent, not more complicated. Most recurring issues come from the same four areas: watering, light, soil and drainage, and the indoor environment around the plant.
Prevention works when you build habits that match how the plant actually grows in your home. A pothos near a bright window, for example, will not behave like the same pothos in a dark corner, even if you water both on the same day.
Start With the Four Basics
Long-term prevention gets much easier when you check these regularly:
- Watering: only when the plant actually needs it
- Light: enough for healthy growth, but not more than the plant can handle
- Soil and drainage: loose enough to drain, stable enough to hold some moisture
- Airflow and humidity: enough to reduce stress, mold, and pest pressure
At Radiant Plants, we’ve found that repeated plant problems usually are not caused by one dramatic mistake. They are more often caused by a small mismatch that keeps happening every week, like slightly overwatering in low light or keeping a plant too close to a heating vent.
Proper Watering Habits
Watering is where the most preventable plant problems begin. The goal is not to water less or more in general. The goal is to water at the right time, based on soil dryness, pot size, light, and season.
What actually works:
- Check the soil before watering
- Water thoroughly so the root ball is evenly moistened
- Let excess water drain out completely
- Empty saucers and outer pots so roots are not sitting in trapped water
- Adjust frequency as the seasons change
A better habit is to ask:
- Is the top layer dry?
- Is the pot still heavy from the last watering?
- Is the plant actively growing right now?
- Has the room become cooler, darker, or drier?
Common beginner mistakes:
- Watering on a fixed schedule instead of checking the potting mix
- Giving tiny surface-level sips instead of deep watering
- Assuming drooping always means thirst
- Ignoring how much slower soil dries in lower light
Real home scenario: a ZZ plant watered every Sunday may look fine in summer, then start yellowing in winter because the soil stays wet much longer. The schedule did not change, but the plant’s needs did.
Get the Light Right
Light affects almost everything else, including watering speed, growth rate, and how well a plant recovers from stress. Low light can slow drying, weaken growth, and increase the chance of overwatering issues. Too much direct sun can scorch leaves and create damage that gets mistaken for disease.
What actually works:
- Match the plant to the light you truly have, not the light you wish you had
- Watch how the plant responds over time, especially the new growth
- Move plants gradually when increasing light exposure
- Rotate plants if one side is leaning heavily toward the window
How to tell the difference:
- Low light problems often show up as slow growth, leggy stems, smaller leaves, or soil staying wet too long
- Too much direct sun usually causes pale, scorched, or dry patches on exposed leaves
Common beginner mistakes:
- Calling a dim room “bright indirect light.”
- Moving a shade-adapted plant straight into the harsh sun
- Forgetting that winter window light is weaker and shorter
At Radiant Plants, we’ve found that “mystery plant problems” often start with a light mismatch. Once light improves, watering becomes easier to manage, and recovery usually gets more predictable.
Use the Right Soil and Drainage
Healthy roots need both moisture and oxygen. That is why prevention is not just about how often you water, but also about how the soil holds and releases water. Dense, compacted soil can keep roots wet too long, while extremely fast-draining soil may dry too fast for certain plants.
What actually works:
- Use a pot with drainage holes
- Repot into a fresh mix when the soil has broken down or stays wet too long
- Choose a mix suited to the type of plant
- Avoid containers that trap water around the nursery pot without airflow or drainage awareness
What to watch for:
- Soil shrinking away from the edges may mean it has become too dry and hard to rewet
- Soil that stays soggy for many days may be too dense, or the pot may be too large
- Repeated fungus gnats or surface mold often point to chronically wet conditions
Common beginner mistakes:
- Using decorative pots without checking for drainage
- Repotting into a container much larger than the root ball
- Keeping old, compacted soil for too long because the plant “still fits.”
Real home scenario: a snake plant in a heavy peat-based mix can stay wet much longer than expected, especially in a cool room. The issue may look like random yellowing, but the real problem is the root zone staying airless.
Improve Airflow and Humidity
Airflow and humidity are often overlooked, but they matter more than many people realize. Poor airflow can encourage fungal issues and slow drying at the soil surface. Very dry indoor air can increase stress and make some pests, especially spider mites, more likely to be indoors.
What actually works:
- Give plants some space instead of crowding them tightly together
- Avoid trapping them in stale corners with no air movement
- Keep sensitive plants away from heating vents or strong, cold drafts
- Raise humidity thoughtfully if the plant benefits from it
How to tell the difference:
- Dry air stress often shows up as brown tips, crisp edges, or faster dehydration
- Poor airflow is more often associated with mildew, moldy soil, or lingering dampness
Common beginner mistakes:
- Misting as a cure-all
- Grouping too many plants with no air circulation
- Keeping a plant beside a heater and blaming the damage on watering alone
At Radiant Plants, we’ve found that a plant struggling with repeated mildew or spider mites often improves more from better placement and environment than from repeated treatments alone.
Long-Term Plant Problem Prevention Checklist
Use this simple checklist to prevent the most common plant problems:
- Check the soil before watering
- Water thoroughly, then let excess drain
- Match the plant to the light available
- Adjust care when seasons change
- Use well-draining soil and pots with drainage
- Inspect leaves regularly, especially the undersides
- Avoid sudden moves between very different conditions
- Space plants enough for airflow
- Quarantine new plants before placing them with others
- Watch for new growth for the earliest signs of stress
That last point matters more than many guides mention. New growth often tells you sooner than old leaves whether your prevention strategy is working.
Seasonal Note: Why Problems Change Through the Year
Prevention needs to shift with the season. In many homes, winter brings lower light, cooler conditions near windows, and drier air from heating. That means plants often use water more slowly, while pest pressure from dry air can rise at the same time.
In warmer, brighter months:
- Plants may dry faster
- growth may increase
- Watering may need to happen more often
In cooler, darker months:
- Soil may stay wet much longer
- The overwatering risk goes up
- Some plants that become more prone to stress from drafts and dry indoor heat
This is one reason fixed routines fail. What worked in July may create plant problems in January.
What Prevents Problems Best Over Time
The strongest prevention strategy is not perfection. It is an observation. When you notice how fast the soil dries, how the leaves respond to light, and how the plant reacts to seasonal change, small corrections become much easier than major rescues.
That is what actually keeps most plant problems from coming back.
When Your Plant Problem Is Serious
Some plant problems are reversible, but others mean the plant is in severe decline and may not fully recover. A plant is usually in serious trouble when the roots are badly damaged, the stem base is collapsing, disease has spread through much of the plant, or there is little to no healthy tissue left to support recovery.
The goal here is not to panic. It is to tell the difference between a stressed plant that needs time and a plant that has crossed into major structural damage.
Warning Box: Signs the Problem May Be Serious
Treat the issue as urgent if you notice any of these:
- Most of the root system is black, mushy, or foul-smelling
- The stem base feels soft or collapsed
- The crown is rotting
- Leaf loss is rapid and widespread
- new growth is distorted, blackening, or dying as soon as it appears
- disease spots are spreading across many leaves quickly
- The plant does not improve after the obvious cause has been corrected
- The remaining tissue is mostly mushy, hollow, or dried out beyond recovery
A serious plant problem does not always mean the whole plant is gone, but it usually means you need to stop guessing and make a clean decision fast.
Signs a Plant May Not Recover
A houseplant is much harder to save when it has lost both its root function and its growing point. Leaves can regrow. Minor root damage can recover. But if the roots are mostly dead and the main stem or crown is rotting, the odds drop fast.
Here is how to judge it more clearly:
More likely recoverable
- Some roots are still white or firm
- The stem is solid, not soft
- Only part of the foliage is damaged
- The plant has at least one healthy growth point left
- Symptoms slowed after you corrected the cause
Less likely to recover
- roots are mostly black, mushy, and smell rotten
- The crown or stem base is soft
- The plant continues collapsing even after care changes
- There is no healthy new growth or viable node left
- The damage has reached most of the plant
At Radiant Plants, we’ve found that beginners often focus too much on the leaves and not enough on the base of the plant. But for severe decline, the most important clues are usually in the roots, crown, and lower stem.
Severe Root Rot: When It Has Gone Beyond Simple Overwatering
Severe root rot is one of the clearest examples of a serious plant problem. Mild overwatering can often be corrected. Severe root rot is different because the root system has already lost its ability to support the plant.
Signs it is severe
- The soil smells sour or rotten
- roots fall apart when touched
- The base of the stem is soft
- leaves are yellowing and drooping at the same time
- The plant stays limp even though the soil is wet
- Blackened roots make up most of the root ball
What to do
- Remove the plant from the pot and inspect the roots directly.
- Trim only the clearly rotten roots with sanitized tools.
- Check whether enough healthy roots remain to support recovery.
- Repot into a fresh, well-draining mix only if viable roots are still present.
- If the crown or stem base is already rotting, consider whether propagation from healthy tissue is the better option.
What often fails: keeping the plant in the same wet soil and “waiting to see.” Once roots are actively rotting, waiting usually means losing more of the plant.
Real home scenario: a peace lily with a few yellow leaves and soggy soil may still be recoverable. A peace lily with a rotten smell, collapsing stems, and mushy roots is in a very different category.
Advanced Disease: When It Is More Than a Cosmetic Issue
Not every spot or patch means disaster. The problem becomes serious when the disease is spreading faster than the plant can replace damaged tissue, or when major portions of the foliage are affected.
Signs of disease may be advanced
- Multiple leaves are rapidly developing spots or lesions
- Stems are becoming discolored or soft
- Powdery or fungal growth returns quickly after removal
- older and newer leaves are both affected
- The tissue is dying back in several parts of the plant at once
This is where many people lose time by trying random sprays without removing badly damaged growth or improving the environment that allowed the disease to spread.
What to do
- Isolate the plant from others
- remove severely affected leaves with sanitized tools
- improve airflow
- Avoid wetting foliage if it may be contributing
- Confirm whether the issue is fungal, bacterial, or pest-related before treating
- Monitor whether new growth remains healthy
If the disease keeps moving through new growth even after conditions improve, the plant may be too compromised to recover fully.
How to Tell “Dying” From “Stressed”
This is one of the most useful distinctions competitors often skip. A stressed plant may look dramatic, but still have a real chance of recovery. A dying plant usually shows progressive structural failure.
Often just stressed
- drooping after repotting
- temporary yellowing after a move
- Some leaves drop after environmental change
- slowed growth during winter
Potentially dying
- The stem base is soft
- The crown is rotting
- The roots are mostly gone
- Decline continues despite correcting care
- There is almost no firm, healthy tissue left
At Radiant Plants, we’ve found that a lot of “dying plant” fears come from shock, not fatal damage. A fiddle leaf fig dropping a few leaves after relocation is stressful, but it is not the same as a plant with a collapsing trunk or a rotten crown.
What to Do Right Now if the Problem Is Serious
When the issue looks severe, use this order:
- Inspect the roots or the stem base
- Do not rely on the leaves alone.
- Isolate the plant
- Especially if disease or pests may be involved.
- Remove clearly dead or rotting tissue
- Use clean tools and avoid tearing.
- Decide whether recovery is realistic
- Look for healthy roots, firm stem tissue, or viable nodes.
- Choose one rescue path
- Repot if roots are salvageable
- propagate if healthy cuttings remain
- discard if disease or rot is too advanced
This kind of decision-making saves more plants than repeated low-confidence treatments.
What Actually Works When Recovery Is Still Possible
If the plant still has a healthy structure left, the most effective rescue plan is usually simple:
- stabilize the environment
- stop over-handling
- fix the core cause
- protect healthy tissue
- Watch new growth, not just old damage
What often fails:
- Fertilizing a severely stressed plant too soon
- repotting repeatedly
- watering out of panic
- treating for multiple possible causes at once
- keeping heavily infected plants near healthy ones
A damaged leaf may never recover, and that can make progress harder to notice. What matters more is whether the plant produces healthier new growth or stops declining after intervention.
When It Is Better to Propagate Instead of Rescue
This is another practical step that many articles do not explain clearly. If the base of the plant is failing but a healthy vine, node, pup, or stem section remains, propagation may be the smarter move than trying to save the entire original root system.
This applies especially when:
- Roots are limited to the lower part of the plant
- Upper growth is still healthy
- The species roots easily from cuttings or division
- The mother plant is declining too quickly to rebuild from the roots
Real home scenario: if a pothos has root rot in the pot but several healthy vines with viable nodes, taking clean cuttings may preserve the plant faster than trying to rehabilitate a collapsing root ball.
A Realistic Way to Think About Serious Plant Problems
Not every plant can be saved, and being realistic is part of good plant care. The win is not always restoring the plant to perfection. Sometimes the win is catching a serious problem early enough to save part of it, stop the spread, or avoid making the damage worse.
FAQs
What are common plant problems?
Common plant problems include yellow leaves, brown spots, drooping, white residue, mold on soil, root rot, and pest infestations like aphids or spider mites. Most plant problems are caused by watering issues, poor light, pests, or unhealthy soil, and can usually be fixed once the exact cause is identified.
How do I know what’s wrong with my plant?
To identify plant problems, start by checking the leaves, soil, and recent changes. Look for signs like yellowing, spots, drooping, or pests. Then confirm the cause by comparing symptoms with soil moisture and environment, since most plant problems require more than one clue to diagnose correctly.
What are 10 common plant diseases?
Common plant diseases include powdery mildew, root rot, leaf spot, downy mildew, blight, rust, anthracnose, damping-off, bacterial leaf spot, and wilt diseases. These plant problems are usually caused by fungi, bacteria, or poor growing conditions, and often appear as spots, mold, yellowing, or plant decline.
Can plants recover from serious plant problems?
Yes, many plants can recover from plant problems if healthy roots or stems remain. Recovery is less likely when roots are mushy, the stem base is rotting, or damage has spread across most of the plant. Always check root health before deciding if recovery is possible.
Most plant problems become manageable once you focus on the basics: identify the symptom, confirm the cause, and apply the right fix instead of guessing. Checking the soil, environment, and leaf patterns will guide you to better decisions and faster recovery. Small adjustments often make the biggest difference. If you stay consistent and observant, you’ll prevent many issues before they start. For deeper solutions, explore the specific guides linked throughout to handle each problem with confidence.